First, I stripped all of the old caning off. It was more obnoxious than I planned, but I got it all off, leaving just the frame:
Before you can start caning, you have to soak the caning for a while. The directions I used said 2 hours... wish I had checked elsewhere. It was so soggy, it wouldn't hold its shape, and I had to be careful not to rip it. You only need to soak it for about 20-30 minutes, just until it doesn't crack when you bend it. This will make the process a whole lot easier than what I went through.
Once it's soaked, you cut off a reasonable length of rush, and start working. Please see this website for directions, if you want to do it. It was the clearest in explaining the pattern. I'd also recommend some youtube videos. I really liked this guy's video. His is real neat and clean looking. Mine didn't go nearly as smoothly as his. Here's how it goes:
The reason why you have to cut off some of the caning rather than using all of it at once is because everywhere you weave the caning, the entire piece you're working on has to come with you. I learned this the hard way. Once you've got a shorter piece (still long though), it's much easier. You weave from corner to corner, slowly working your way in. Here's how the first couple of rounds looked:
 After you've got quite a bit on, you fit in triangles of cardboard for extra support. These are not necessary, but they add to the structure of the chair.
 Here's what it looks like with all of them in:
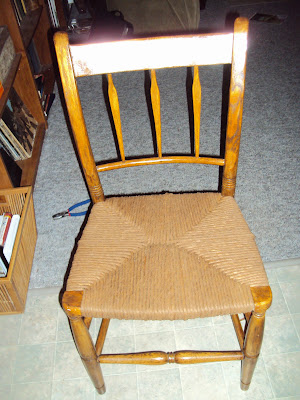
From there you just keep going. If you're working on a square seat, it's easier because it'll just work out. My seat is slightly trapazoidal, so it wasn't so easy. I kind of made it up at the end, but the video I mentioned earlier shows how to do this with ease (really wish I'd looked at that video before starting!). Here was my finished product:
The caning was so wet that I'm still waiting for my seat to dry, but it looks great! I'll be doing the other one soon, and I'll try to do that one right. Will report about that one later.


whoa! i am so megga-impressed. will you please come over and make my house look awesome?
ReplyDeletei didn't even know what caning was til i read this... boo me....